Wednesday 29 January 2020

Android Animation Ham Button

Ham Button in Android

Ham is also called as Boom Button, its nothing but animated buttons in Android like showed in following view.


Step 1: Setup Gradle & Maven
                                                   Download : Code

implementation 'com.nightonke:boommenu:1.0.9'
Step 2: Setup Layout 

<com.nightonke.boommenu.BoomMenuButton
    android:id="@+id/boom"
    android:layout_width="wrap_content"
    android:layout_height="wrap_content"
    android:layout_alignParentEnd="true"
    android:layout_alignParentRight="true"
    android:layout_alignParentBottom="true"
    android:layout_margin="20dp"
    android:checkableBehavior="single"
    app:boom_button_color="@color/colorPrimary"
    app:boom_button_pressed_color="@color/colorPrimary"
    app:boom_inActionBar="false" />
Step 3: Write Java Code (MainActivity.java)

public class MainActivity extends AppCompatActivity {

  private boolean init = false;
  private BoomMenuButton boomMenuButton;

  @Override
  protected void onCreate(Bundle savedInstanceState) {
      super.onCreate(savedInstanceState);
      setContentView(R.layout.activity_main);
      boomMenuButton = findViewById(R.id.boom);

  }

  @Override
  public void onWindowFocusChanged(boolean hasFocus) {
      super.onWindowFocusChanged(hasFocus);

      // Use a param to record whether the boom button has been initialized
      // Because we don't need to init it again when onResume()
      if (init) return;
      init = true;

      Drawable[] subButtonDrawables = new Drawable[3];
      int[] drawablesResource = new int[]{
              R.drawable.search,
              R.drawable.refresh,
              R.drawable.settings
      };
      for (int i = 0; i < 3; i++)
          subButtonDrawables[i] = ContextCompat.getDrawable(this, drawablesResource[i]);

      int[][] subButtonColors = new int[3][2];
      for (int i = 0; i < 3; i++) {
          subButtonColors[i][1] = ContextCompat.getColor(this, R.color.textcolor);
          subButtonColors[i][0] = Util.getInstance().getPressedColor(subButtonColors[i][1]);
      }

      // Now with Builder, you can init BMB more convenient
      new BoomMenuButton.Builder()
              .addSubButton(ContextCompat.getDrawable(this, R.drawable.search), subButtonColors[0], "Search")
              .addSubButton(ContextCompat.getDrawable(this, R.drawable.refresh), subButtonColors[0], "Refresh")
              .addSubButton(ContextCompat.getDrawable(this, R.drawable.settings), subButtonColors[0], "Setting")
              .button(ButtonType.HAM)
              .boom(BoomType.PARABOLA)
              .place(PlaceType.HAM_3_1)
              .subButtonTextColor(ContextCompat.getColor(this, R.color.colorPrimaryDark))
              .subButtonsShadow(Util.getInstance().dp2px(2), Util.getInstance().dp2px(2))
              .onSubButtonClick(new BoomMenuButton.OnSubButtonClickListener() {
                  @Override
                  public void onClick(int buttonIndex) {
                      switch (buttonIndex) {
                          default:
                              Toast.makeText(getApplicationContext(), "Ham Button Clicked", Toast.LENGTH_SHORT).show();
                              break;
                      }
                  }
              })
              .init(boomMenuButton);
  }
} 

Step 4: Compile and Run.

Download full code.

15 Best Open-Source Android Apps With Source Code 2020

Best open-source Android apps with source code:

1. Telegram

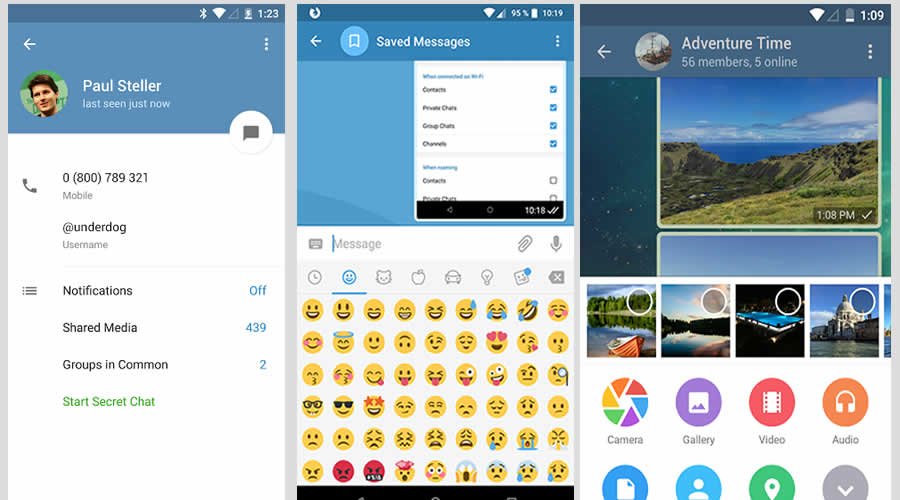
Telegram is one of the mostly used encrypted instant messaging service available for Android and iOS. Learn from the Telegram code — how an instant messaging app with super security works.

Telegram - Best open-source Android apps

2. Lawnchair Launcher

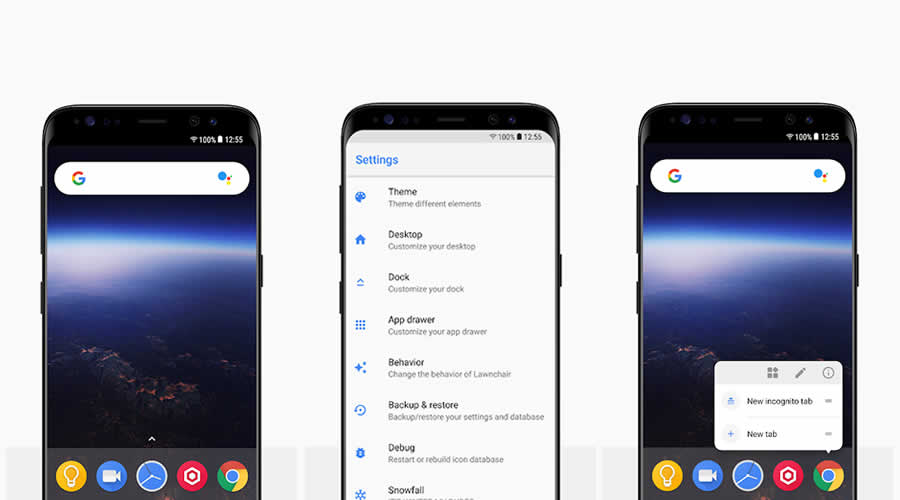
Lawnchair is a simple open-source Android launcher app bringing Pixel features. If you are developing a new Android launcher, then refer the codes of Lawnchair, because it may help you to integrate different Android customization options to your app.
                                                            Download Code

Lawnchair Launcher - Best open-source Android apps

3. Minimal ToDo

Minimal ToDo is a lightweight Android app for the to-do list. This app will help beginners to develop a simple yet powerful to-do list app.

Minimal ToDo - Best open-source Android apps

4. Amaze File Manager

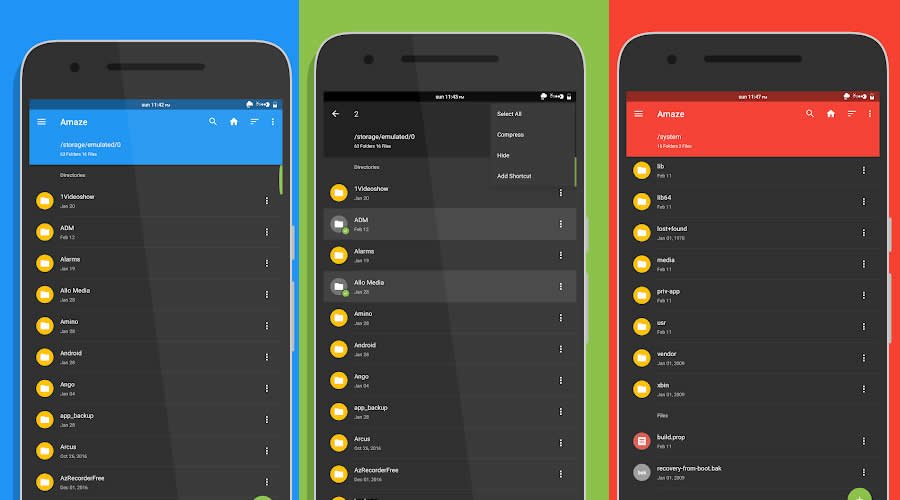
Amaze File Manager is a lite file manager app for Android with material design guidelines. There are a lot of things you can learn from this app, like how to manage files on SD cards, cloud services support, AES Encryption and Decryption of files for security, etc.

Amaze File Manager - Best open-source Android apps

5. Open Camera

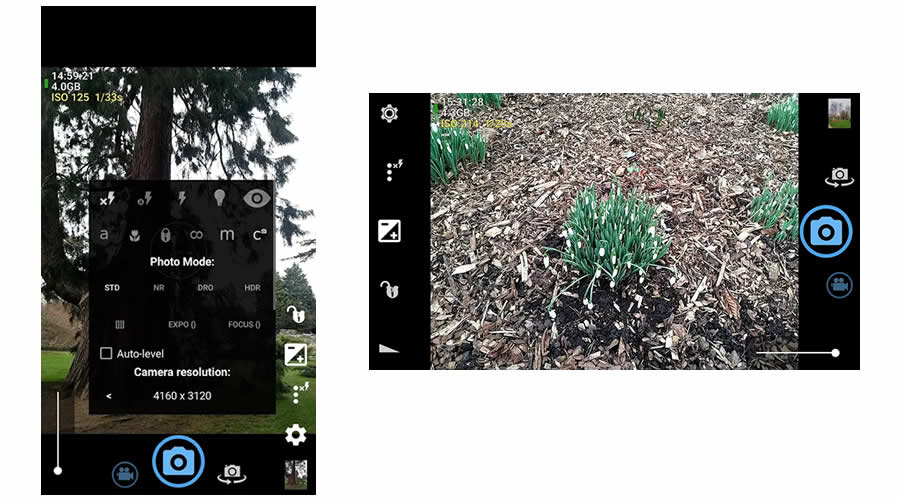
Open Camera is a fully featured and open-source camera app for Android devices. The project will help you know about how to add the auto-stabilization option on a camera app, how to take photo remotely by making a noise, multi-touch gesture and single-touch control on the camera app, etc.

Open Camera - Best open-source Android apps

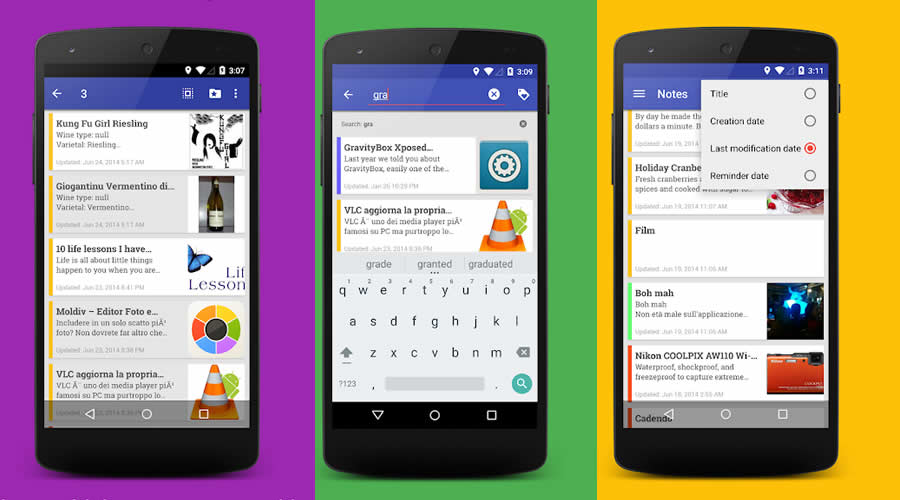
6. OmniNotes

Fully-featured lightweight open-source Android note-taking application. With OmniNotes app source code will help to develop your own note talking application with features like basic add, modify, archive, trash and delete notes actions, insertion of an image, audio and generic file attachments in notes, including a To-do list feature on your note app, etc.

OmniNotes - Best open-source Android apps

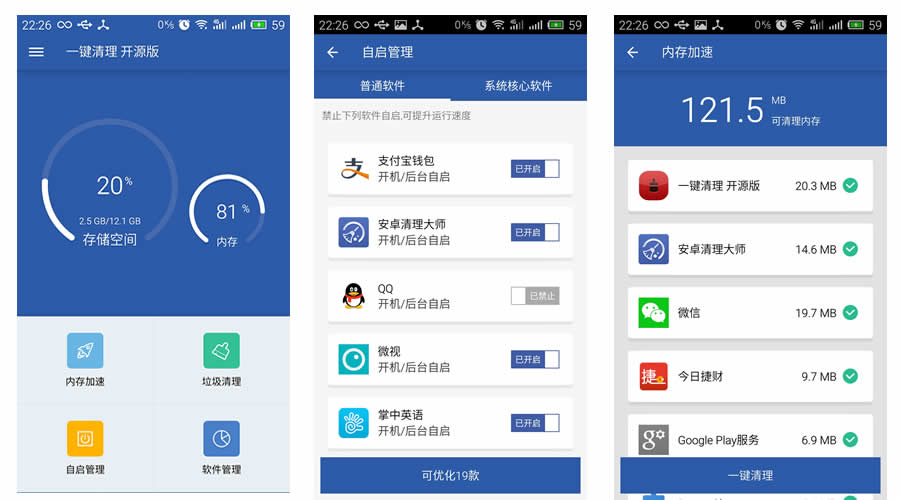
7. Super Clean Master

Similar to Clean Master app, Super Clean Master is used to clean up some junk data from your Android device. Super Clean Master project will help you to understand the collection and detection of junk files and how to handle it in an elegant way. the project is a little bit complicated, it will take some time for beginners to fully grasp the source code.

Super Clean Master - Best open-source Android apps

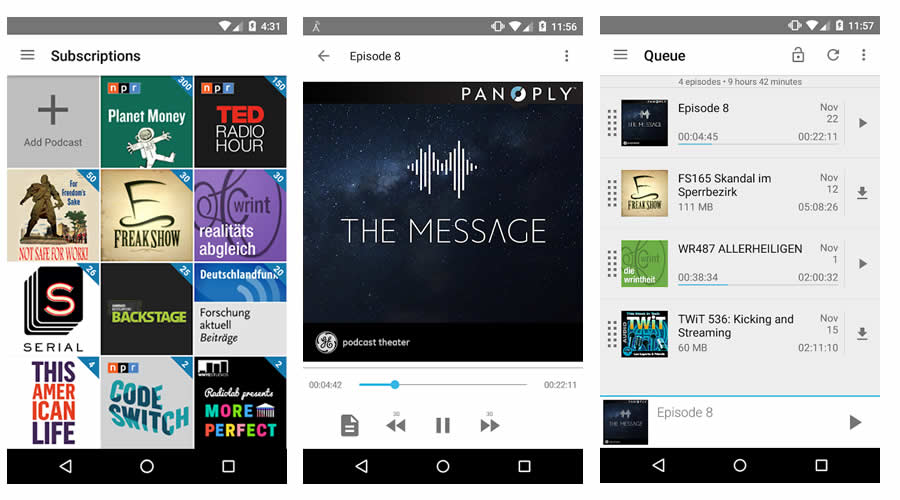
8. AntennaPod

AntennaPod is a podcast manager and player that gives you instant access to millions of free and paid podcasts. This open-source Android app will teach you different integration techniques, managing playback settings, etc.

AntennaPod - Best open-source Android apps

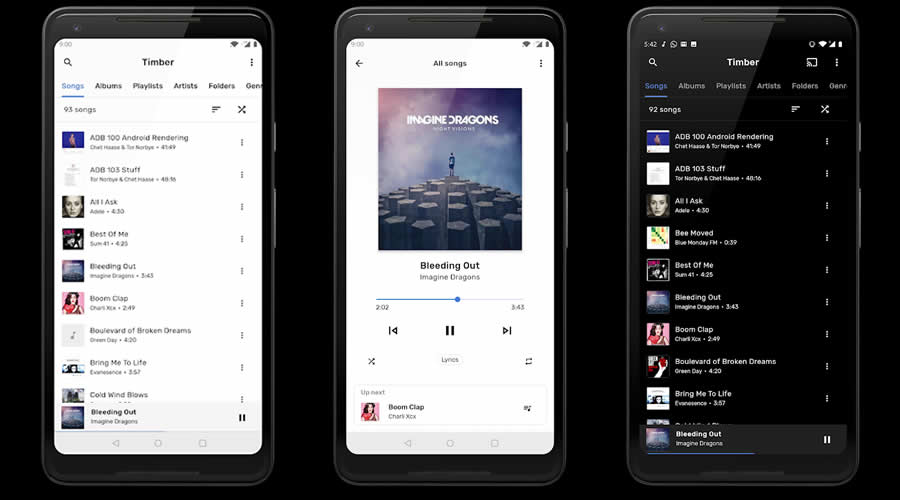
9. TimberX Music Player

TimberX Music Player is one of the new open-source Android apps written in Kotlin. TimberX comes with a simple UI with great features. The app source code will help you learn data binding and dependency injection. The app has cross-platform support — it works on phones, Android Wear, Android Auto, Chrome cast and other cast devices and Google Assistant.

TimberX Music Player - Best open-source Android apps

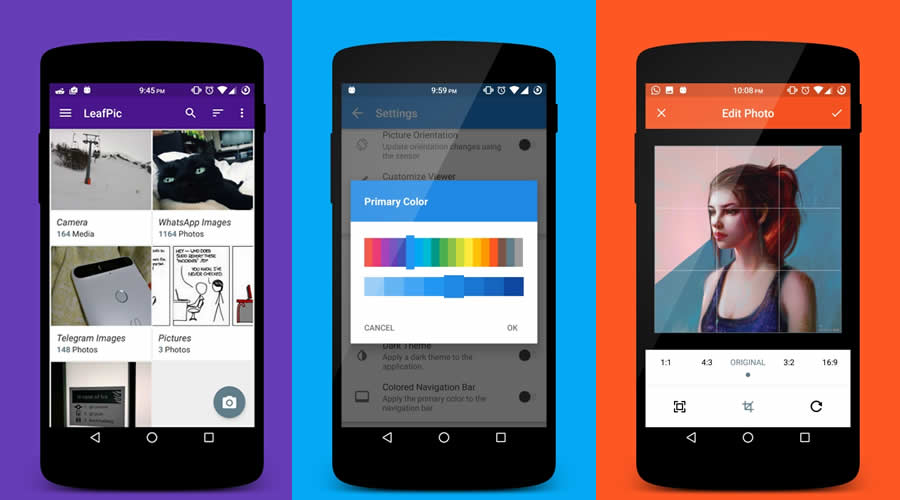
10. LeafPic

LeafPic is a fluid, material-designed alternative gallery app for Android. It comes with all stock gallery features and the source code is really a helpful guide for a beginner Android developer.

LeafPic - Best open-source Android apps

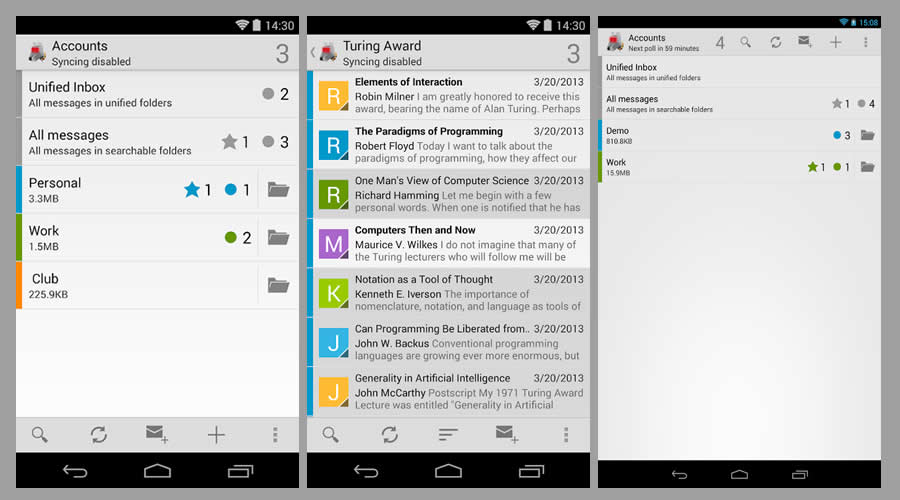
11. K-9 Mail

K-9 Mail - Best open-source Android apps
K-9 Mail is an open-source email client for Android with support for multiple accounts, search, IMAP push email, multi-folder sync, flagging, filing, signatures, BCC-self, PGP/MIME & more. This project helps you to understand the working of an email client and how to implement IMAP, POP3, and Exchange 2003/2007.

K-9 Mail - Best open-source Android apps

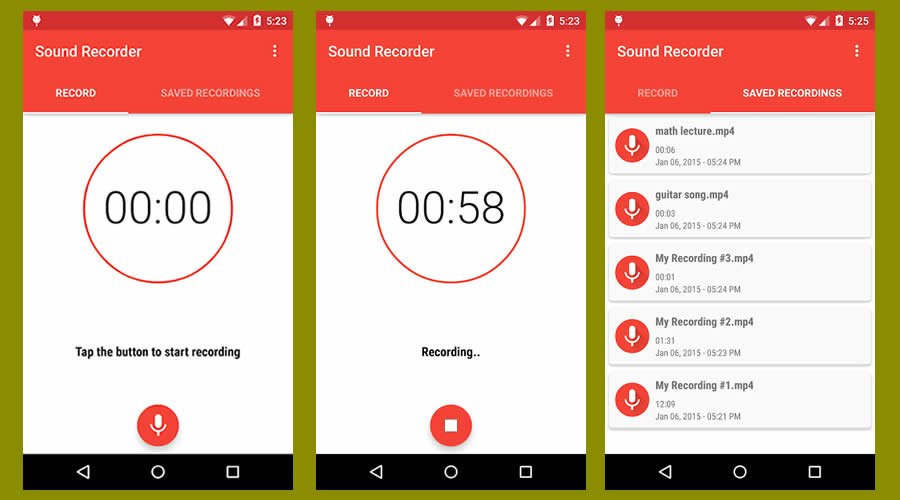
12. Easy Sound Recorder

Easy Sound Recorder - Best open-source Android apps
Easy Sound Recorder is a simple open-source sound recorder app with material design. The project will help you to learn Android voice recording integration and manipulation in apps.

Easy Sound Recorder - Best open-source Android apps

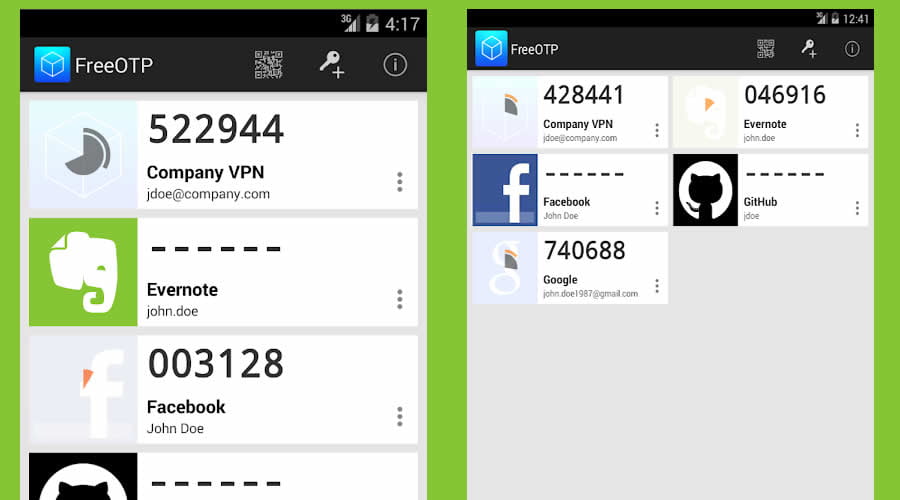
13. FreeOTP Authenticator

FreeOTP Authenticator - Best open-source Android apps
FreeOTP is an open-source 2FA authenticator developed by Red Hat. The app source code teaches you the working of an authenticator app, how to generate one-time passwords on your mobile devices which can be used in conjunction with your normal password to make your login nearly impossible to hack.

FreeOTP Authenticator - Best open-source Android apps

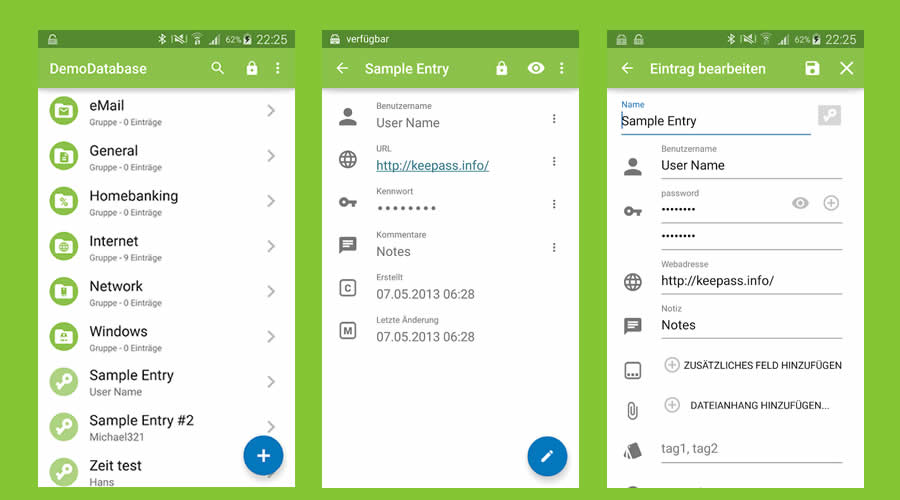
14. Keepass2Android Password Safe

Keepass2Android Password Safe - Best open-source Android apps
Keepass2Android is an open-source password manager app for Android. The projects make you understand the security features of a password manager and how to safeguard and auto save passwords using built-in cloud storage options.

Keepass2Android Password Safe - Best open-source Android apps

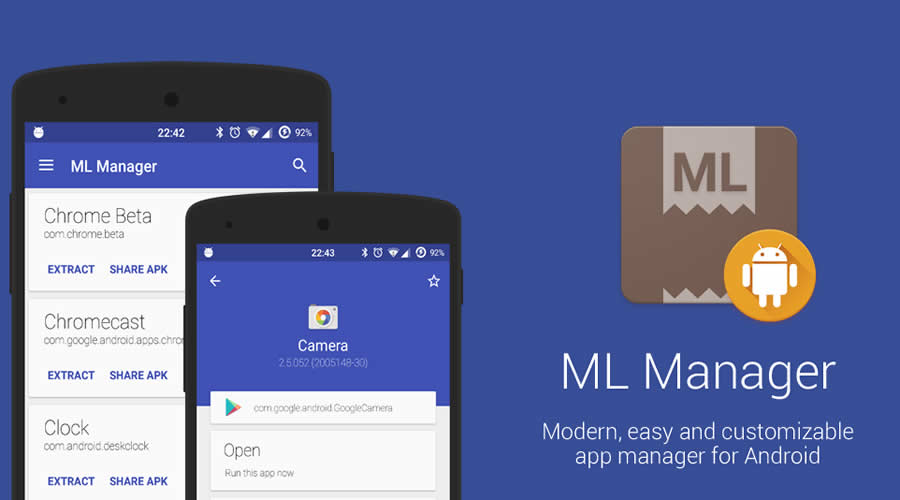
15. ML Manager

ML Manager - Best open-source Android apps
A modern, easy and customizable open-source app manager for Android with root features. The project helps you to learn how to extract installed & system apps and save locally as APK, uninstallation process of apps, etc

ML Manager - Best open-source Android apps

Monday 27 January 2020

Windows

Wednesday 22 January 2020

How to install NoxPlayer Emulator and connect to Android Studio

How to connect Android Studio with Nox App Player for Android development and debug

Nox App Player is a full feature Android emulator which could be used for Android development, testing and debugging. This post will give a step by step guidance on how to connect Nox with Android Studio as an example. It could also be connected to intellij idea and eclipse as well.


1. Download and install the latest version of Nox App Player from our official website: https://www.bignox.com/
2. Start Android studio and create a new activity
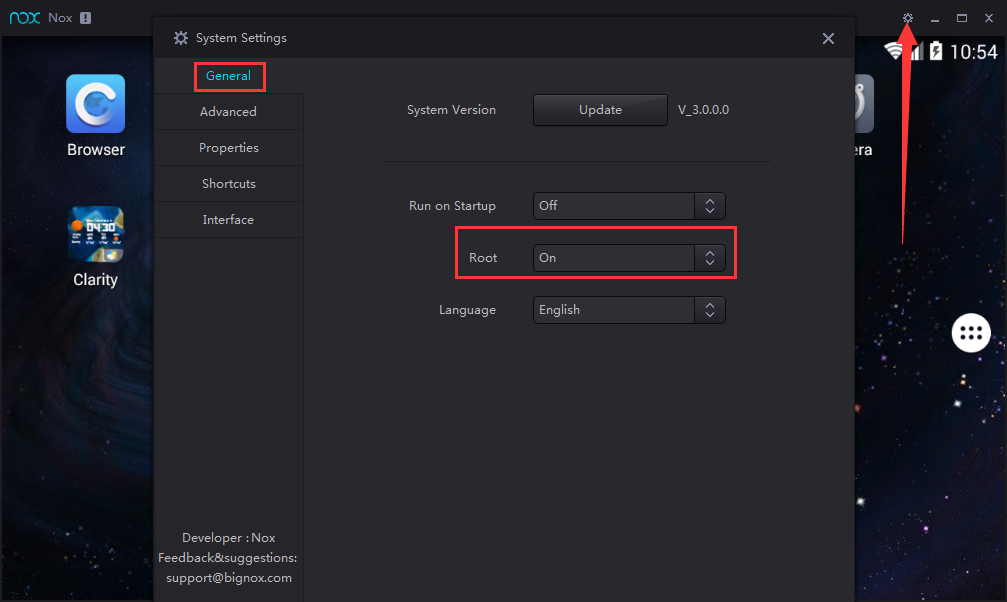
3. Start Nox App Player, go to Nox system settings >> turn root mode on >> save changes and restart Nox
Note: Nox is defaulted to start in tablet mode, you could choose in System Settings >> Advanced >> Startup Setting >> Phone to better emulate the Android phone experience
Root
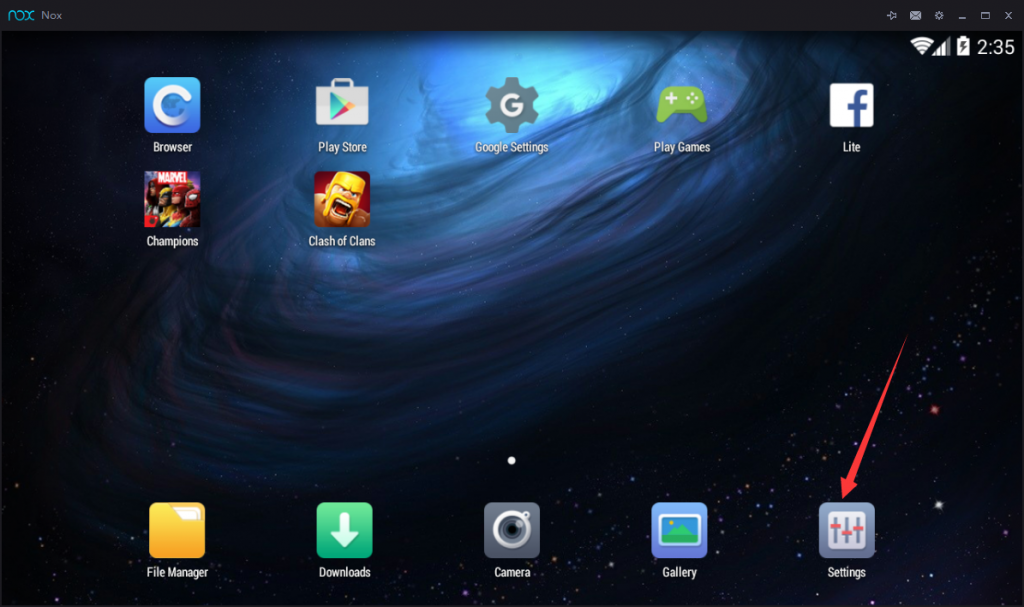
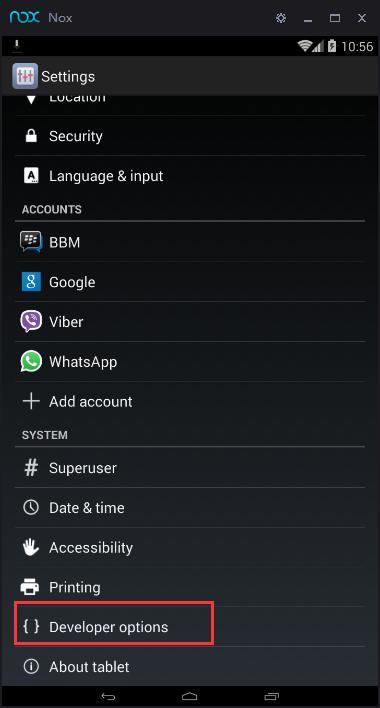
4. Go to Android settings in Nox >> About Tablet >> Keep clicking Build number until it shows that you are now a developer >> go back to Android settings and you will find the developer options now
                                                          Download.
Android settings
 Settings
Developer options
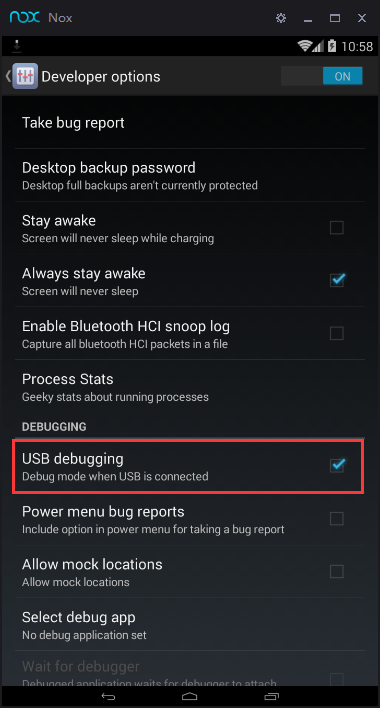
5. Go to developer options >> tick USB debugging
USB debugging
6. Now in cmd go to the bin folder under the installation path of Nox App Player, input this command: nox_adb.exe connect 127.0.0.1:62001. You will see a successfully connected notice in cmd. If it shows null or offline, just re-start Nox and try again.
cmd
7. Now Android studio will detect Nox.


Saturday 4 January 2020

Context menu in Android with example

First of all we need to register view for using Context menu. This method will set the View.OnCreateContextMenuListener on the view to this activity, so onCreateContextMenu(ContextMenu, View, ContextMenuInfo) will be called when it is time to show the context menu.

public void onCreateContextMenu(ContextMenu menu, View v,
ContextMenuInfo menuInfo) {
     super.onCreateContextMenu(menu, v, menuInfo);
     menu.setHeaderTitle("Context Menu");
     menu.add(0, v.getId(), 0, "Action 1");
     menu.add(0, v.getId(), 0, "Action 2");
     menu.add(0, v.getId(), 0, "Action 3");
}

onCreateContextMenu (ContextMenu menu, View v, ContextMenu.ContextMenuInfo menuInfo)
                This method is triggered when the screen is long pressed and context menu view is being built
menu –  The actual context menu being built, using which we can set its properties.
                                                     Download Code

public void onCreateContextMenu(ContextMenu menu, View v,
ContextMenuInfo menuInfo) {
    super.onCreateContextMenu(menu, v, menuInfo);
    menu.setHeaderTitle("Context Menu");
    menu.add(0, v.getId(), 0, "Action 1");
    menu.add(0, v.getId(), 0, "Action 2");
    menu.add(0, v.getId(), 0, "Action 3");
}

onContextItemSelected(MenuItem item)
                This is called whenever an item in the context menu is selected and the interface MenuItem provides necessary details on the selected item. Through which we can write our own functionality to be perform based on item selection. 


public boolean onContextItemSelected(MenuItem item) {
   if (item.getTitle() == "Action 1") {
      Toast.makeText(this, "Action 1 invoked", Toast.LENGTH_SHORT).show();
   }
   else if (item.getTitle() == "Action 2") {
      oast.makeText(this, "Action 2 invoked", Toast.LENGTH_SHORT).show();
   }
   else if (item.getTitle() == "Action 3") {
      Toast.makeText(this, "Action 3 invoked", Toast.LENGTH_SHORT).show();
   } 
   else {
      return false;
   }
   return true;
}

On the layout page I have just display a text and button, long press button to see the output shown below.
Context Menu
activity_main.xml

<?xml version="1.0" encoding="utf-8"?>
<LinearLayout xmlns:android="http://schemas.android.com/apk/res/android"
    android:layout_width="fill_parent"
    android:layout_height="fill_parent"
    android:gravity="center"
    android:orientation="vertical" >

    <TextView
        android:layout_width="wrap_content"
        android:layout_height="wrap_content"
        android:text="Welcome to compiletimeerror.com" />

    <Button
        android:id="@+id/btn"
        android:layout_width="wrap_content"
        android:layout_height="wrap_content"
        android:text="Long press me!" />

</LinearLayout>

MainActivity.java


package com.example.contextmenu;

import android.app.Activity;
import android.os.Bundle;
import android.view.ContextMenu;
import android.view.MenuItem;
import android.view.View;
import android.view.ContextMenu.ContextMenuInfo;
import android.widget.Button;
import android.widget.Toast;

public class MainActivity extends Activity {
 /** Called when the activity is first created. */
 @Override
 public void onCreate(Bundle savedInstanceState) {
  super.onCreate(savedInstanceState);
  setContentView(R.layout.activity_main);

  Button btn = (Button) findViewById(R.id.btn);
  registerForContextMenu(btn);
 }
 @Override
 public void onCreateContextMenu(ContextMenu menu, View v,
   ContextMenuInfo menuInfo) {
  super.onCreateContextMenu(menu, v, menuInfo);
  menu.setHeaderTitle("Context Menu");
  menu.add(0, v.getId(), 0, "Action 1");
  menu.add(0, v.getId(), 0, "Action 2");
  menu.add(0, v.getId(), 0, "Action 3");
 }
 @Override
 public boolean onContextItemSelected(MenuItem item) {
  if (item.getTitle() == "Action 1") {
   Toast.makeText(this, "Action 1 invoked", Toast.LENGTH_SHORT).show();
  } else if (item.getTitle() == "Action 2") {
   Toast.makeText(this, "Action 2 invoked", Toast.LENGTH_SHORT).show();
  } else if (item.getTitle() == "Action 3") {
   Toast.makeText(this, "Action 3 invoked", Toast.LENGTH_SHORT).show();
  } else {
   return false;
  }
  return true;
 }

}
Download Source code of this application

How to create custom ExpandableListView in Android

1. Make application interface: The main layout of this app demo have a text view, a button and an expandable list view.
<?xml version="1.0" encoding="utf-8"?>
<RelativeLayout xmlns:android="http://schemas.android.com/apk/res/android"
    android:layout_width="fill_parent"
    android:layout_height="fill_parent"
    android:orientation="vertical" >
   
    <LinearLayout android:id="@+id/linear1"
             android:orientation="horizontal"
             android:layout_width="fill_parent"
             android:layout_height="wrap_content"
             android:layout_alignParentBottom="true" 
                 android:background="@android:color/holo_blue_dark"
                 android:gravity="center" >    
             <Button 
                 android:id="@+id/btn1"
                 android:layout_width="180dp"
                 android:layout_height="wrap_content"
                 android:layout_marginTop="5dp"
                 android:layout_marginBottom="5dp"
                 android:textSize="22dp"
                 android:text="Buy all cars you have selected"  />
     </LinearLayout>  
    
    <ExpandableListView
        android:id="@+id/expandableListView1"
        android:layout_width="match_parent"
        android:layout_height="match_parent"
        android:layout_above="@+id/linear1"
        android:layout_below="@+id/linear2"
        android:groupIndicator="@drawable/group_indicator_selector"
        android:background="@android:color/holo_blue_light"  >
        </ExpandableListView>
       
    <LinearLayout android:id="@+id/linear2"
             android:orientation="vertical"
             android:layout_width="fill_parent"
             android:layout_height="wrap_content"
             android:layout_alignParentTop="true"
             android:background="@android:color/holo_blue_dark"
             android:gravity="center">      
        <TextView
                android:id="@+id/text_intro"
                android:textSize="20sp"
                android:layout_width="wrap_content"
                android:layout_height="50dp"
                android:gravity="center_vertical|center_horizontal"
                android:textColor = "#FFFFFF"
                android:text="Select cars you want to buy" />
     </LinearLayout>    
    
</RelativeLayout>
For android:groupIndicator of expandable list, create res/drawable/group_indicator_selector.xml and parse all xml content below:
<selector xmlns:android="http://schemas.android.com/apk/res/android">
    <item android:state_expanded="true" android:drawable="@drawable/group_indicator_expanded" />
    <item android:drawable="@drawable/group_indicator" />
</selector>
Now is the time we customize our expandable list view by create the layout for each group item and child item of it:
For group item:                               Download : Code
<?xml version="1.0" encoding="utf-8"?>
<RelativeLayout xmlns:android="http://schemas.android.com/apk/res/android"
    android:layout_width="match_parent"
    android:layout_height="match_parent"
    android:orientation="horizontal"
    android:gravity="center_vertical">
        <CheckBox android:id="@+id/cbx1"
        android:layout_width="wrap_content"
        android:layout_height="wrap_content"
        android:focusable="false"
        android:layout_alignParentRight="true"
        android:button="@drawable/checkbox_selector"
        />
        <ImageView android:id="@+id/image1"
        android:src="@drawable/ic_launcher"
        android:layout_width="50dp"
        android:layout_height="50dp"
        android:layout_marginLeft="25dp"
       
        />
    <TextView
        android:id="@+id/text1"
        android:textSize="20sp"
        android:layout_width="wrap_content"
        android:layout_height="50dp"
        android:layout_marginLeft="95dp" android:gravity="center_vertical"
        android:text="TextView"
            android:textColor = "#000000"/>
</RelativeLayout>
Customize checkbox in group item with android:button attribute by make a checkbox_selector.xml in drawable folder:
<?xml version="1.0" encoding="utf-8"?>
<selector xmlns:android="http://schemas.android.com/apk/res/android">
<item android:state_checked="true"
    android:drawable="@drawable/check" />
<item android:state_checked="false"
    android:drawable="@drawable/uncheck" />
</selector>
For children item:
<?xml version="1.0" encoding="utf-8"?>
<RelativeLayout xmlns:android="http://schemas.android.com/apk/res/android"
    android:layout_width="match_parent"
    android:layout_height="match_parent"
    android:orientation="horizontal"
    android:gravity="center_vertical">
        <ImageView android:id="@+id/image1"
        android:src="@drawable/ic_launcher"
        android:layout_width="50dp"
        android:layout_height="50dp"
        android:layout_marginLeft="25dp"       
        />
    <TextView
        android:id="@+id/text1"
        android:textSize="16sp"
        android:layout_width="wrap_content"
        android:layout_height="wrap_content"
        android:layout_marginLeft="95dp"
        android:gravity="center"
        android:text="TextView" 
        android:textColor = "#000000"/>
</RelativeLayout>
Thus we have completed the design of the interface. Now begin make some codes.
2. Code
2.1. We start by creating the SampleExpandableListAdapter for ExpandableListView
package com.example.expandablelist;
import java.util.HashMap; 
import android.app.Activity;
import android.content.Context;
import android.content.SharedPreferences;
import android.preference.PreferenceManager;
import android.text.Html;
import android.util.Log;
import android.view.LayoutInflater;
import android.view.View;
import android.view.ViewGroup;
import android.widget.BaseExpandableListAdapter;
import android.widget.CheckBox;
import android.widget.CompoundButton;
import android.widget.CompoundButton.OnCheckedChangeListener;
import android.widget.ExpandableListAdapter;
public class SampleExpandableListAdapter extends BaseExpandableListAdapter implements ExpandableListAdapter  {
        public Context context;
        CheckBox checkBox;
    private LayoutInflater vi;
    private String[][] data;
    int _objInt;
    public static Boolean checked[] = new Boolean[1];
 
    HashMap<Long,Boolean> checkboxMap = new HashMap<Long,Boolean>();
    private static final int GROUP_ITEM_RESOURCE = R.layout.group_item;
    private static final int CHILD_ITEM_RESOURCE = R.layout.child_item;
    public String []check_string_array;
   
    public SampleExpandableListAdapter(Context context, Activity activity, String[][] data) {
        this.data = data;
        this.context = context;
        vi = (LayoutInflater) activity.getSystemService(Context.LAYOUT_INFLATER_SERVICE);
       
        _objInt = data.length;
        check_string_array = new String[_objInt];
        popolaCheckMap();
    }
    public void popolaCheckMap(){
        SharedPreferences settings = PreferenceManager.getDefaultSharedPreferences(context); 
        String buffer = null;
       
        for(int i=0; i<_objInt; i++){
                buffer = settings.getString(String.valueOf((int)i),"false");
                if(buffer.equals("false"))
                        checkboxMap.put((long)i, false);
                else checkboxMap.put((long)i, true);
        }
    }
   
    public class CheckListener implements OnCheckedChangeListener{
        long pos;
        public void setPosition(long p){
            pos = p;
        }
        @Override
        public void onCheckedChanged(CompoundButton buttonView,
                boolean isChecked) {
                Log.i("checkListenerChanged", String.valueOf(pos)+":"+String.valueOf(isChecked));
            checkboxMap.put(pos, isChecked);
            if(isChecked == true) check_string_array[(int)pos] = "true";
            else                                  check_string_array[(int)pos] = "false";
           // save checkbox state of each group
            SharedPreferences settings = PreferenceManager.getDefaultSharedPreferences(context);                
            SharedPreferences.Editor preferencesEditor = settings.edit();
            preferencesEditor.putString(String.valueOf((int)pos), check_string_array[(int)pos]);
            preferencesEditor.commit();
        }
    }
    public String getChild(int groupPosition, int childPosition) {
        return data[groupPosition][childPosition];
    }
    public long getChildId(int groupPosition, int childPosition) {
        return childPosition;
    }
    public int getChildrenCount(int groupPosition) {
        return data[groupPosition].length;
    }
    public View getChildView(int groupPosition, int childPosition, boolean isLastChild, View convertView, ViewGroup parent) {
        View v = convertView;
        String child = getChild(groupPosition, childPosition);
        int id_res = 0;
        if(groupPosition == 0){
                if(childPosition == 0) id_res = R.drawable.audi_a4;
                if(childPosition == 1) id_res = R.drawable.audi_q7;
                if(childPosition == 2) id_res = R.drawable.audi_r8;
        }
        else if(groupPosition == 1){
                if(childPosition == 0) id_res = R.drawable.bmw_m6;
                if(childPosition == 1) id_res = R.drawable.bmw_x6;
        }
        else if(groupPosition == 2){
                if(childPosition == 0) id_res = R.drawable.ferrari_enzo;
                if(childPosition == 1) id_res = R.drawable.ferrari_f430;
                if(childPosition == 2) id_res = R.drawable.ferrari_f430_italia;
        }
       
        if (child != null) {
            v = vi.inflate(CHILD_ITEM_RESOURCE, null);
            ViewHolder holder = new ViewHolder(v);
            holder.text.setText(Html.fromHtml(child));
           
            holder.imageview.setImageResource(id_res);
        }
        return v;
    }
    public String getGroup(int groupPosition) {
        return "group-" + groupPosition;
    }
    public int getGroupCount() {
        return data.length;
    }
    public long getGroupId(int groupPosition) {
        return groupPosition;
    }
    public View getGroupView(int groupPosition, boolean isExpanded, View convertView, ViewGroup parent) {
        View v = convertView;
        String group = null;
        int id_res = 0;
        long group_id = getGroupId(groupPosition);
        if(group_id == 0){
                group = "Audi";
                id_res = R.drawable.audi;
        }
        else if(group_id == 1){
                group = "BMW";
                id_res = R.drawable.bmw;
        }
        else if(group_id == 2){
                group = "Ferrari";
                id_res = R.drawable.ferrari;
        }
       
        if (group != null) {
            v = vi.inflate(GROUP_ITEM_RESOURCE, null);
            ViewHolder holder = new ViewHolder(v);
            holder.text.setText(Html.fromHtml(group));
            holder.imageview.setImageResource(id_res);
            holder.checkbox.setFocusable(false);
            CheckListener checkL = new CheckListener();
            checkL.setPosition(group_id);
            holder.checkbox.setOnCheckedChangeListener(checkL);
            holder.checkbox.setChecked(checkboxMap.get(group_id)); 
        }
        return v;
    }
    public boolean isChildSelectable(int groupPosition, int childPosition) {
        return true;
    }
    public boolean hasStableIds() {
        return true;
    }
}
2.2. Create view holder class to hold all component of group item or child item
package com.example.expandablelist;
import android.view.View;
import android.widget.CheckBox;
import android.widget.ImageView;
import android.widget.TextView;
public class ViewHolder {
    public TextView text;
    public CheckBox checkbox;
    public ImageView imageview;
    public ViewHolder(View v) {
        this.text = (TextView)v.findViewById(R.id.text1);
        this.checkbox = (CheckBox)v.findViewById(R.id.cbx1);
        this.imageview = (ImageView)v.findViewById(R.id.image1);
    }
}
2.3. Then in the main activity, set adapter for expandable list view and when user click on the button will show all groups on expandable list view has checked on checkbox by Toast Message.
package com.example.expandablelist;
import android.os.Bundle;
import android.preference.PreferenceManager;
import android.app.Activity;
import android.content.Context;
import android.content.SharedPreferences; 
import android.view.View;
import android.widget.Button;
import android.widget.ExpandableListView;
import android.widget.Toast;
public class ExpandablelistActivity extends Activity {
        final Context context = this;
    private static final String[][] data = {{"audia4","audiq7","audir8"},{"bmwm6","bmwx6"},{"ferrarienzo","ferrarif430","ferrarif430italia"}};
    private ExpandableListView expandableListView;
    Button button1;
   
    @Override
    public void onCreate(Bundle savedInstanceState) {
        super.onCreate(savedInstanceState);
        setContentView(R.layout.activity_expandablelist);
        button1 = (Button)findViewById(R.id.btn1);
        expandableListView = (ExpandableListView)findViewById(R.id.expandableListView1);
        expandableListView.setAdapter(new SampleExpandableListAdapter(context, this, data));
       
        button1.setOnClickListener(new View.OnClickListener() {
                        @Override
                        public void onClick(View v) {
                                // TODO Auto-generated method stub
                                SharedPreferences settings = PreferenceManager.getDefaultSharedPreferences(context); 
                        String buffer = null;
                        String output_String = "";
                        for(int i=0; i<3; i++){
                                buffer = settings.getString(String.valueOf((int)i),"false");
                                if(buffer.equals("true"))
                                        output_String += "group " + i + " ";
                        }
                        output_String += "is checked";
                                Toast.makeText(ExpandablelistActivity.this, output_String, Toast.LENGTH_SHORT).show();
                        }
                });
    }
}
package DucNguyen.example.customlistview;
import java.util.List;
import android.content.Context;
import android.graphics.drawable.Drawable;
import android.view.LayoutInflater;
import android.view.View;
import android.view.ViewGroup;
import android.widget.ArrayAdapter;
import android.widget.ImageView;
import android.widget.RelativeLayout;
import android.widget.TextView;
public class FootballLegendListAdapter extends ArrayAdapter<FootballLegend> {
        private int                             resource;
        private LayoutInflater  inflater;
        private Context                 context;
        public FootballLegendListAdapter ( Context ctx, int resourceId, List<FootballLegend> objects) {
                super( ctx, resourceId, objects );
                resource = resourceId;
                inflater = LayoutInflater.from( ctx );
                context=ctx;
        }
        @Override
        public View getView ( int position, View convertView, ViewGroup parent ) {
                convertView = ( RelativeLayout ) inflater.inflate( resource, null );
                FootballLegend Legend = getItem( position );
                                TextView legendName = (TextView) convertView.findViewById(R.id.legendName);
                legendName.setText(Legend.getName());
                 
                TextView legendBorn = (TextView) convertView.findViewById(R.id.legendBorn);
                legendBorn.setText(Legend.getNick());
                 
                ImageView legendImage = (ImageView) convertView.findViewById(R.id.legendImage);
                String uri = "drawable/" + Legend.getImage();
            int imageResource = context.getResources().getIdentifier(uri, null, context.getPackageName());
            Drawable image = context.getResources().getDrawable(imageResource);
            legendImage.setImageDrawable(image);
           
            ImageView NationImage = (ImageView) convertView.findViewById(R.id.Nation);
                uri = "drawable/" + Legend.getNation();
            imageResource = context.getResources().getIdentifier(uri, null, context.getPackageName());
            image = context.getResources().getDrawable(imageResource);
            NationImage.setImageDrawable(image);
                return convertView;
        }
}


Donate